
Grab the Webflow Project here.
Overview
What is a stateful button?
A stateful button is provides visual feedback during its lifecycle. It changes its appearance based on its current state: idle, loading, and success. When clicked, the button enters a loading state to indicate that it is processing a request, and when the request is completed, the button displays a success state to indicate that the operation was successful.
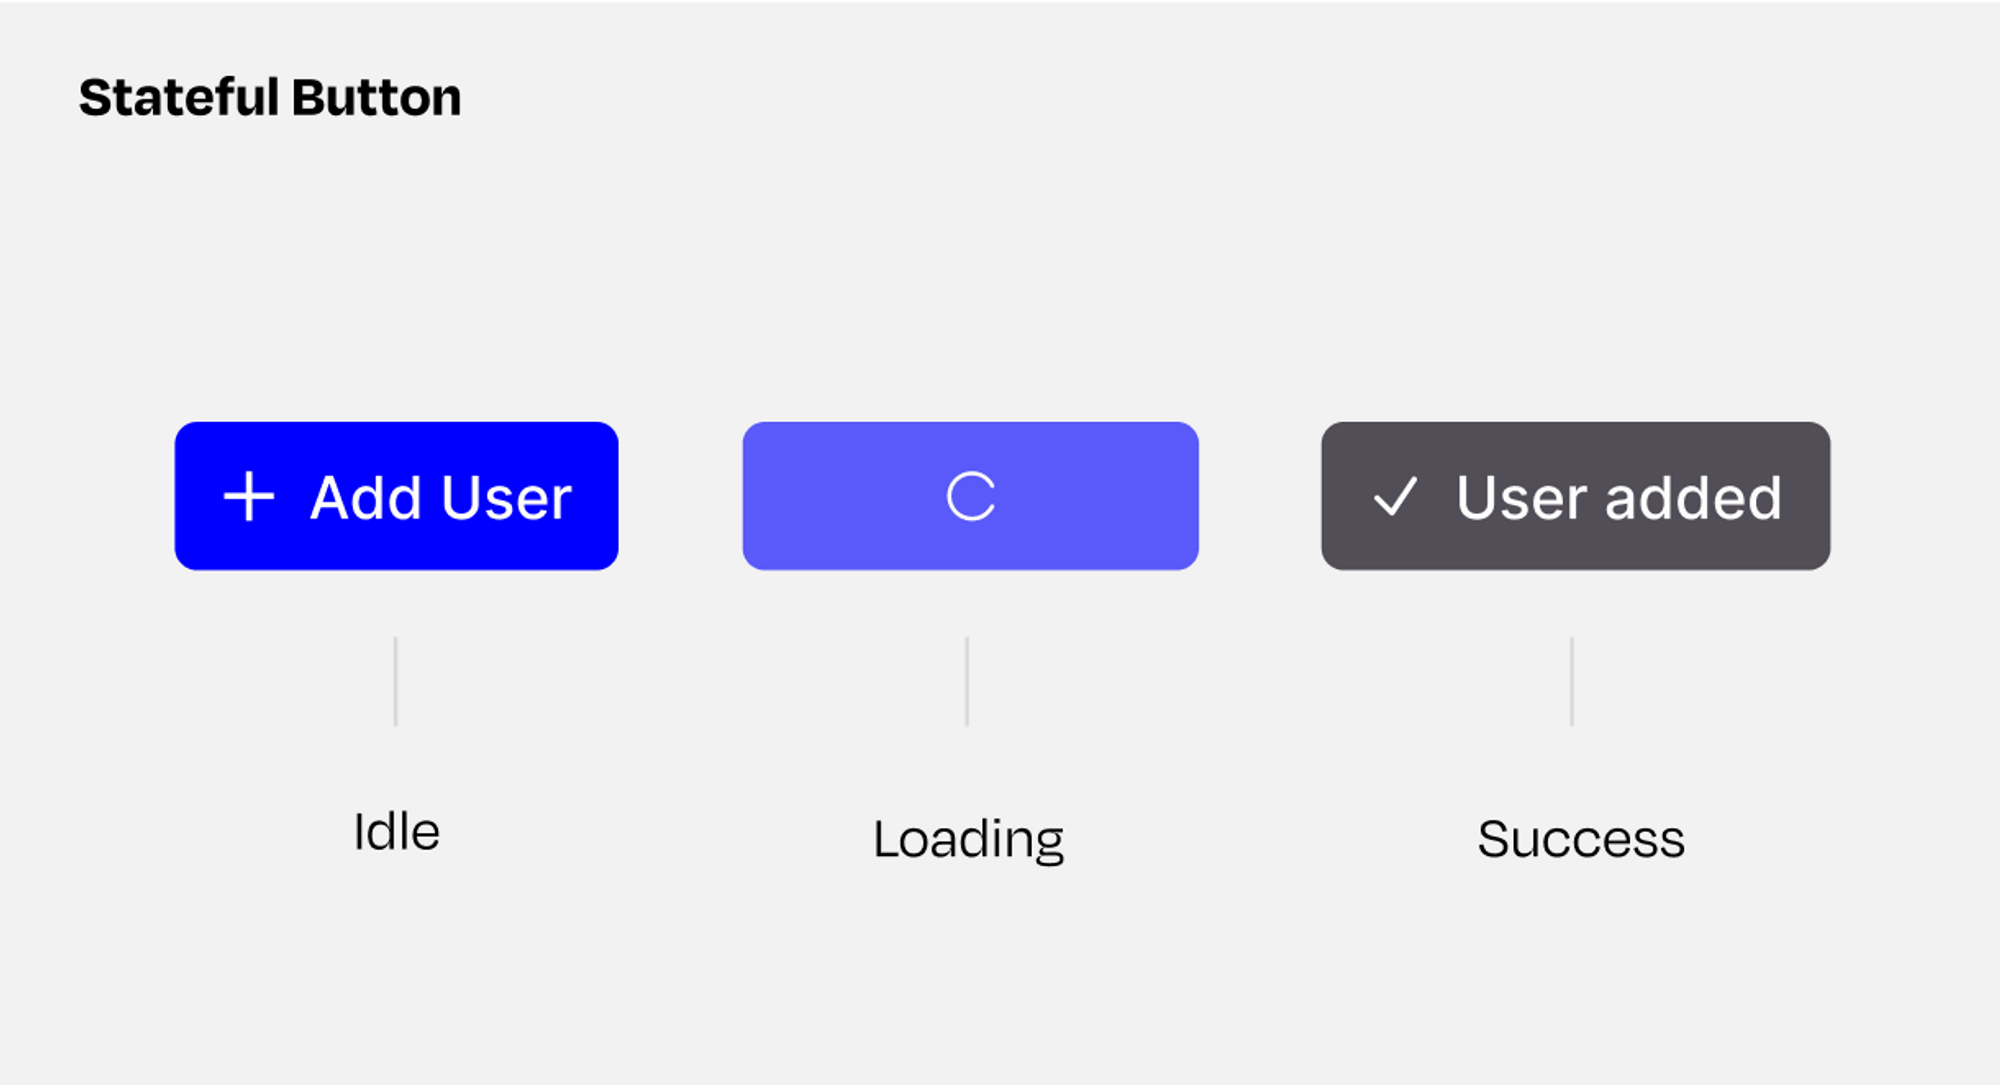
This type of button enhances the user experience by keeping the user informed of the button's status and providing visual cues as to what is happening in the background.
Using Webflow, Wized and Xano to create stateful buttons.
In this guide we will be creating stateful buttons for Xano requests using Webflow and Wized.You’ll learn how to create buttons that provide visual feedback to users. We will be using Webflow to build the interface, elements, and styling of the button. And, Wized, a tool for creating web apps with Webflow, will be used to add interactivity and handle integration with the Xano API. By the end of this guide, you will have a clear understanding of how to create stateful buttons that provide a seamless user experience!
Note: This guide assumes you have already setup your Webflow project in Wized and have a working Xano endpoint.
What we’ll be doing
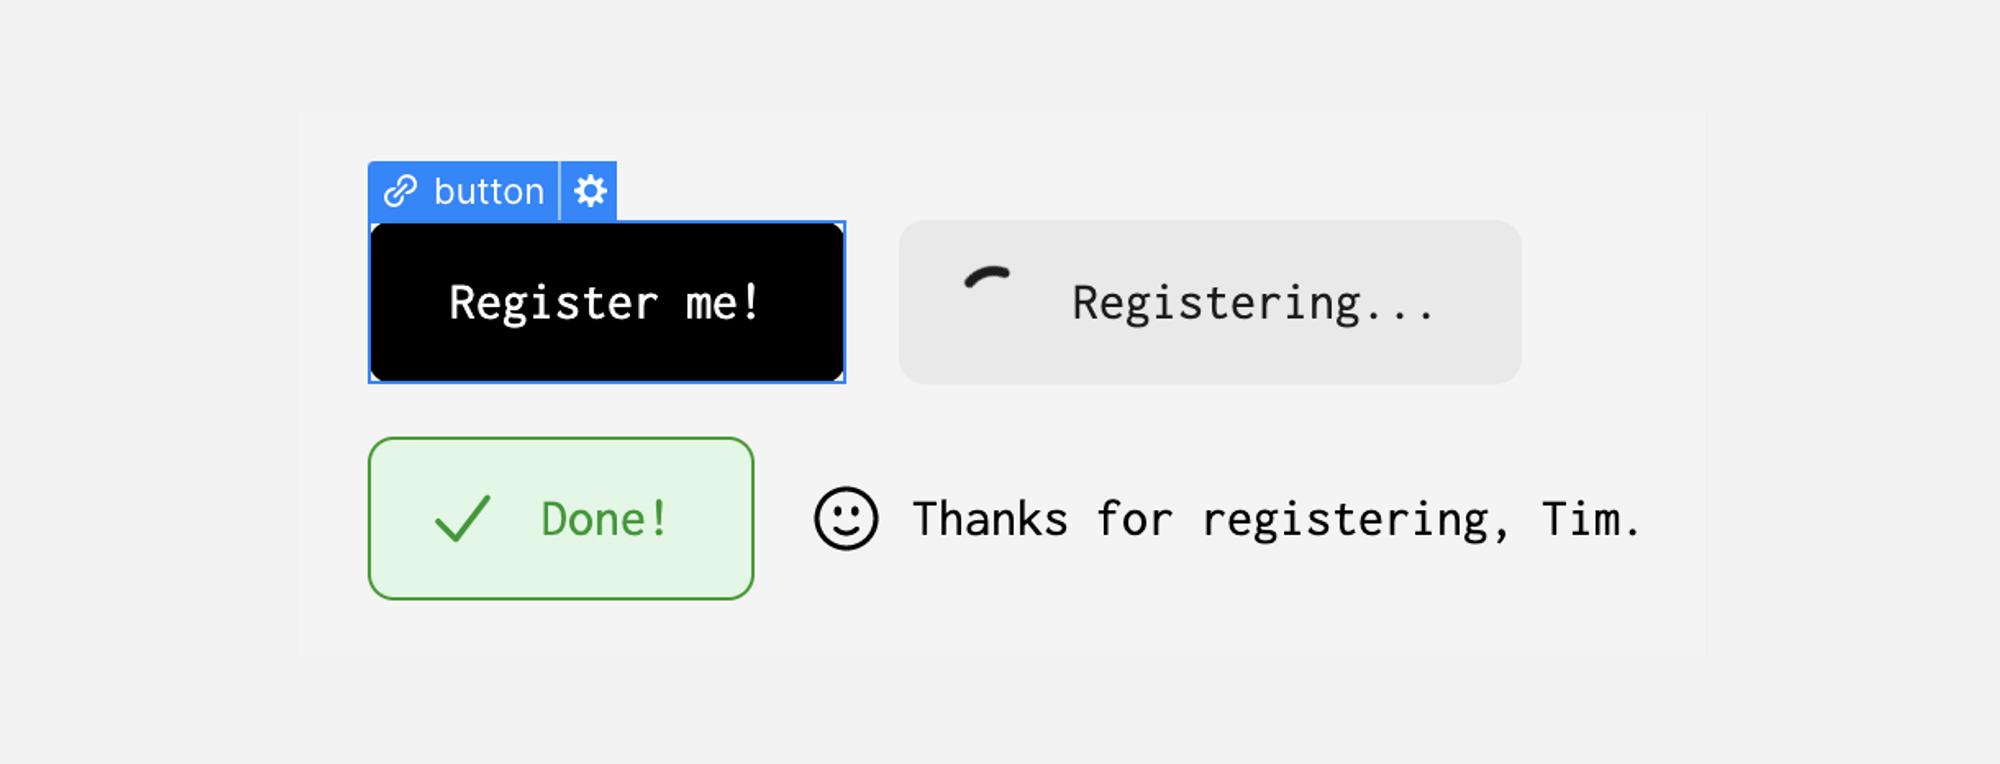
I’ve built out an form mockup for registering new users. This form won’t actually do anything when submitting and is just one example. This method doesn’t actually require a form, only a request to Xano. It cold be used for any kind of button on your site such as ‘Load more’, ‘Show results’ or a form submission
Webflow Overview
In Webflow we’ll be adding a button element for the idle state, and two divs, one for the loading state and one for the success state.
Wized Overview
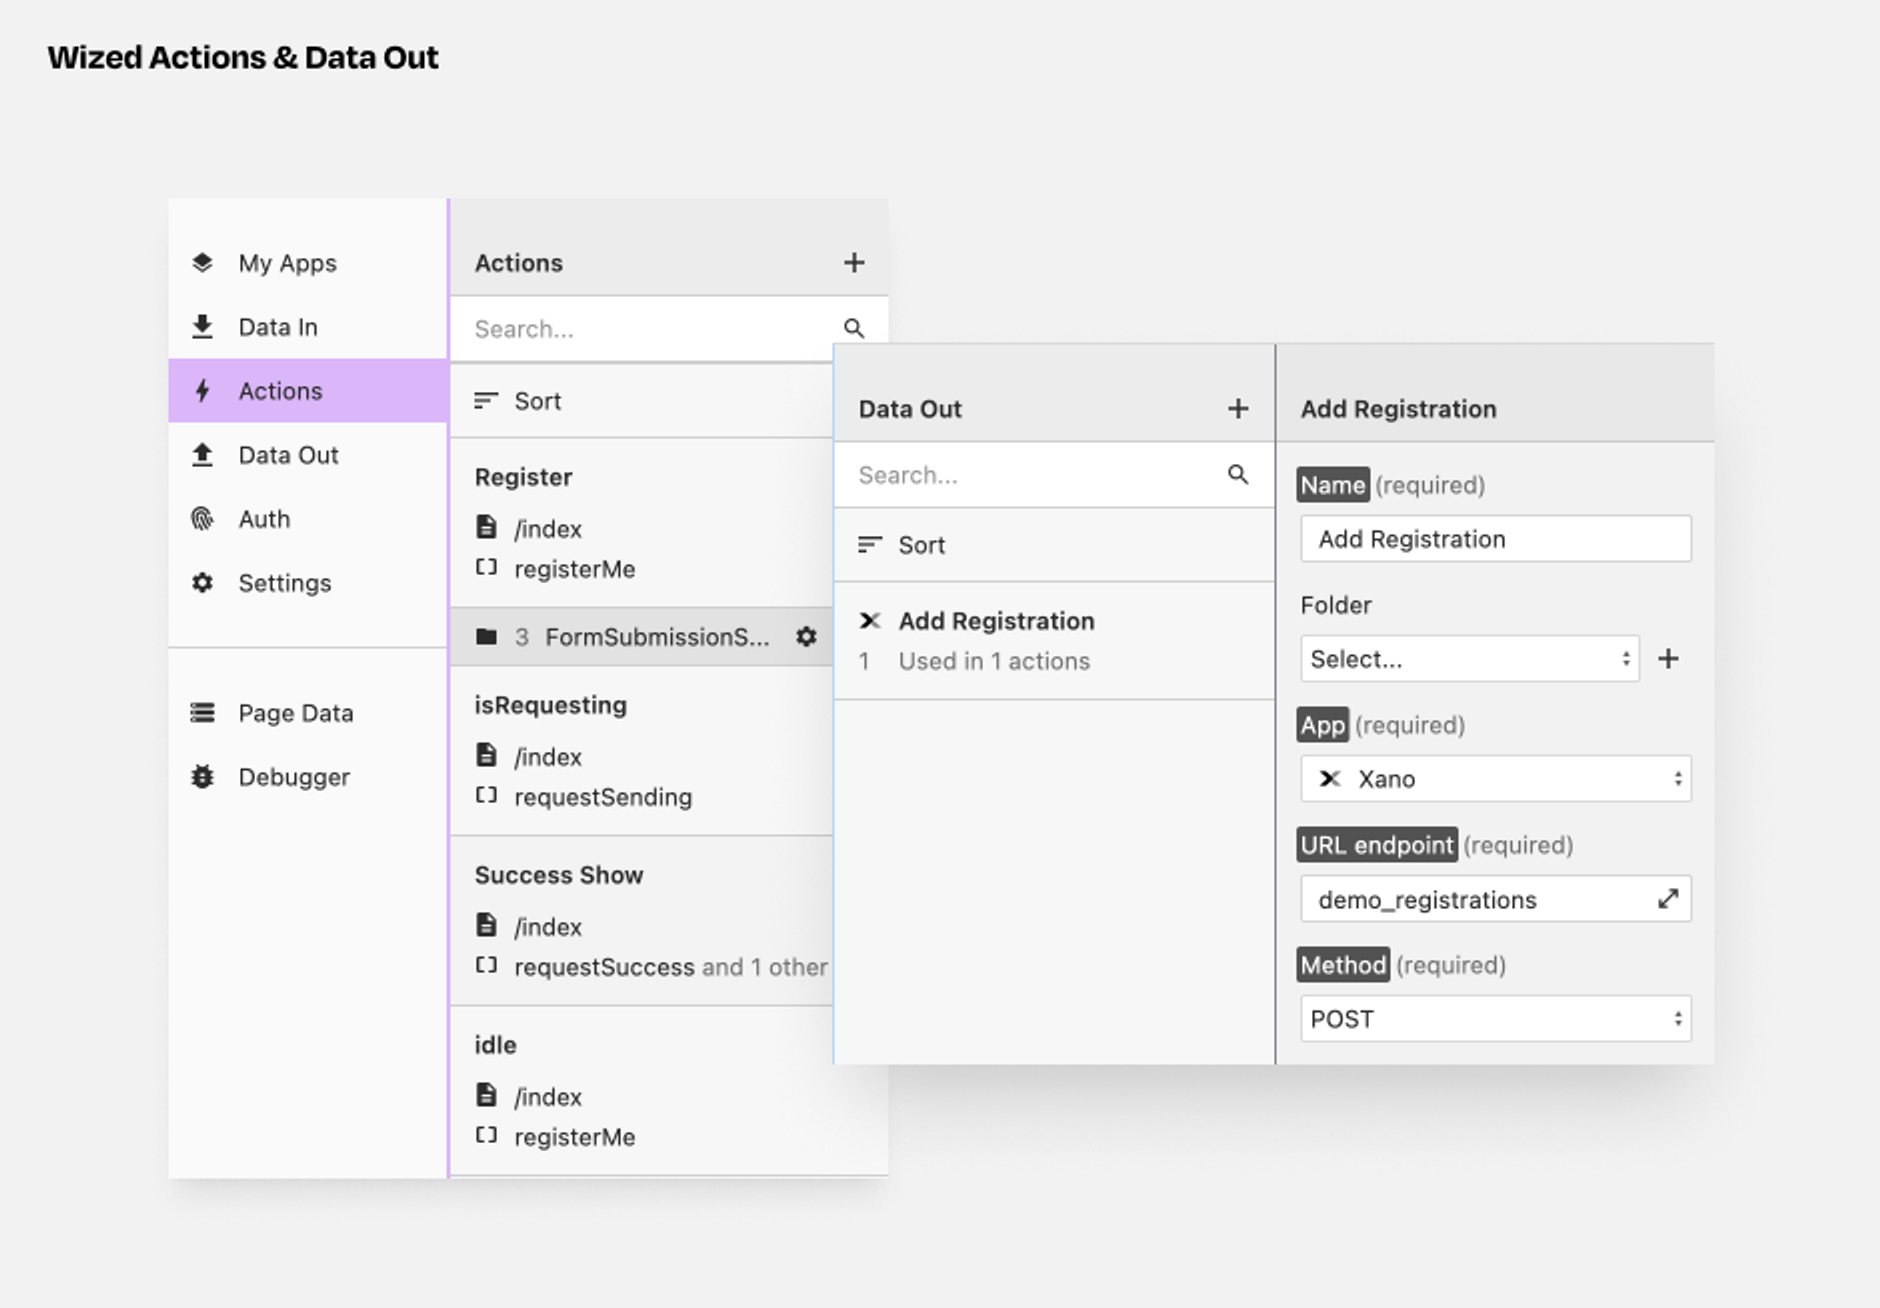
Actions
- registerUserSubmits the request to Xano when button is clicked
- isRequestingShow the loading state of our component
- isSuccessfulShows the successful state of or component
- idleControl when the button is in idle
Data Out
- AddRegistration
Xano Overview
In Xano, you can use any API endpoint you have in your project, there is are no additional steps in Xano. This method can be used with any Xano endpoint that provides a response.
For the purposes of this guide, I’ve just created a simple endpoint in Xano that doesn’t actually do anything except provide a response. The only thing I’m doing in the Xano Function Stack is actually a brief timeout to delay the response a little (Xano is just so damn fast!).
Webflow Setup
Adding the required elements to Webflow. You can clone the Webflow project “Wized Stateful Buttons” here.
Create and style the three button states
- Add a wrapper div
- Add a Link block, Text and Icon and style to your liking!
- Duplicate the link block twice, then right-click and convert each to a div block.
- Add a combo class to each div block .is-loading and .is-success
- Style the two div blocks (One for your loading state, and one for success).
Note: In the cloneable Webflow project, I’ve also added a success message.
Add the Wized attributes
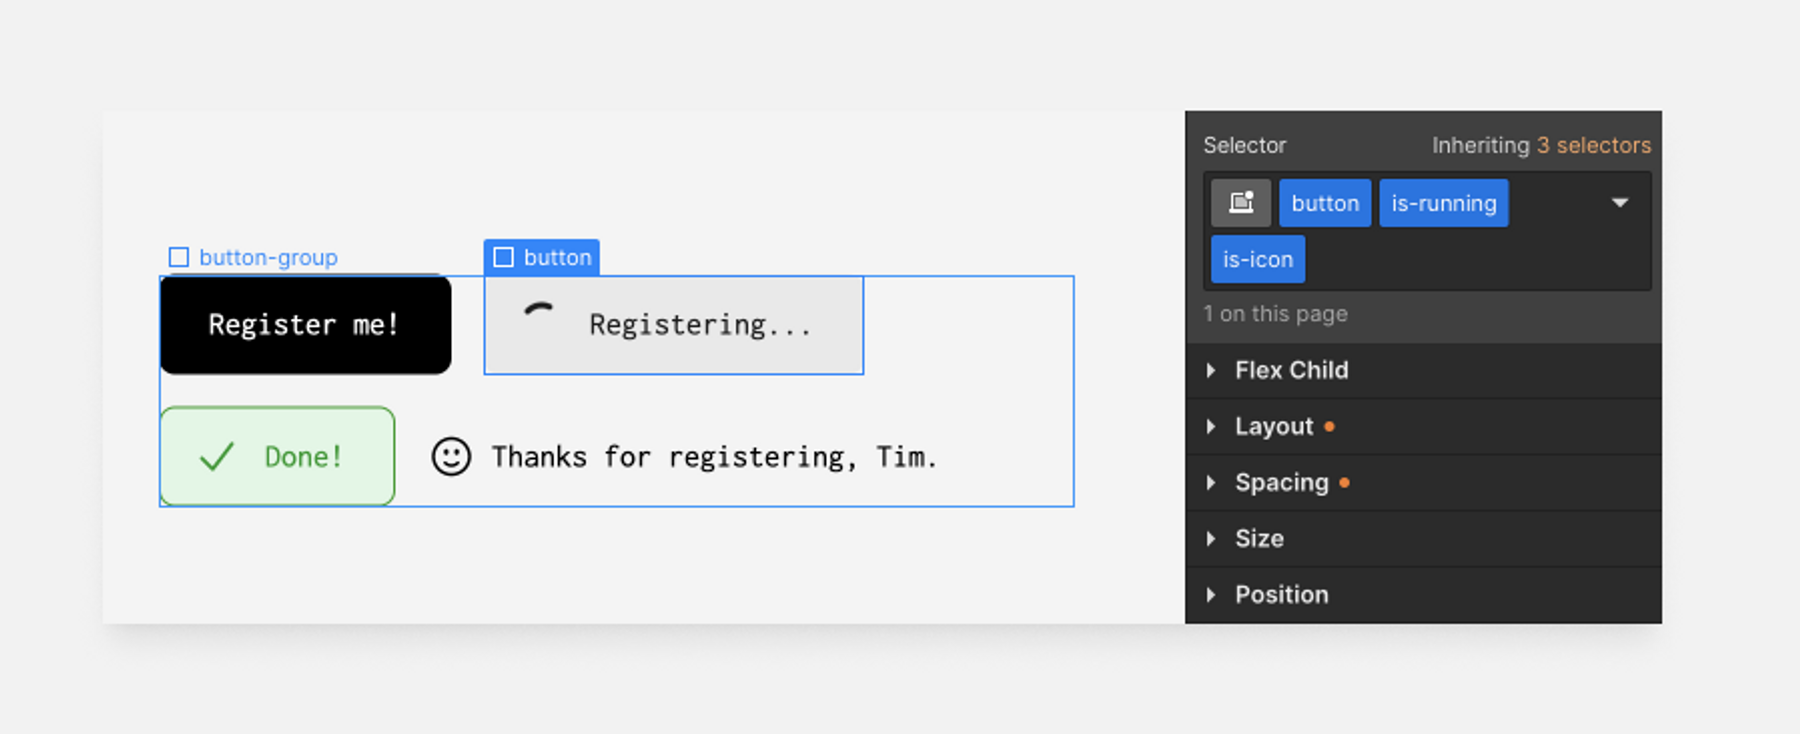
We need to tell Wized about the elements we want to interact with, we do this by adding "w-el" attributes.
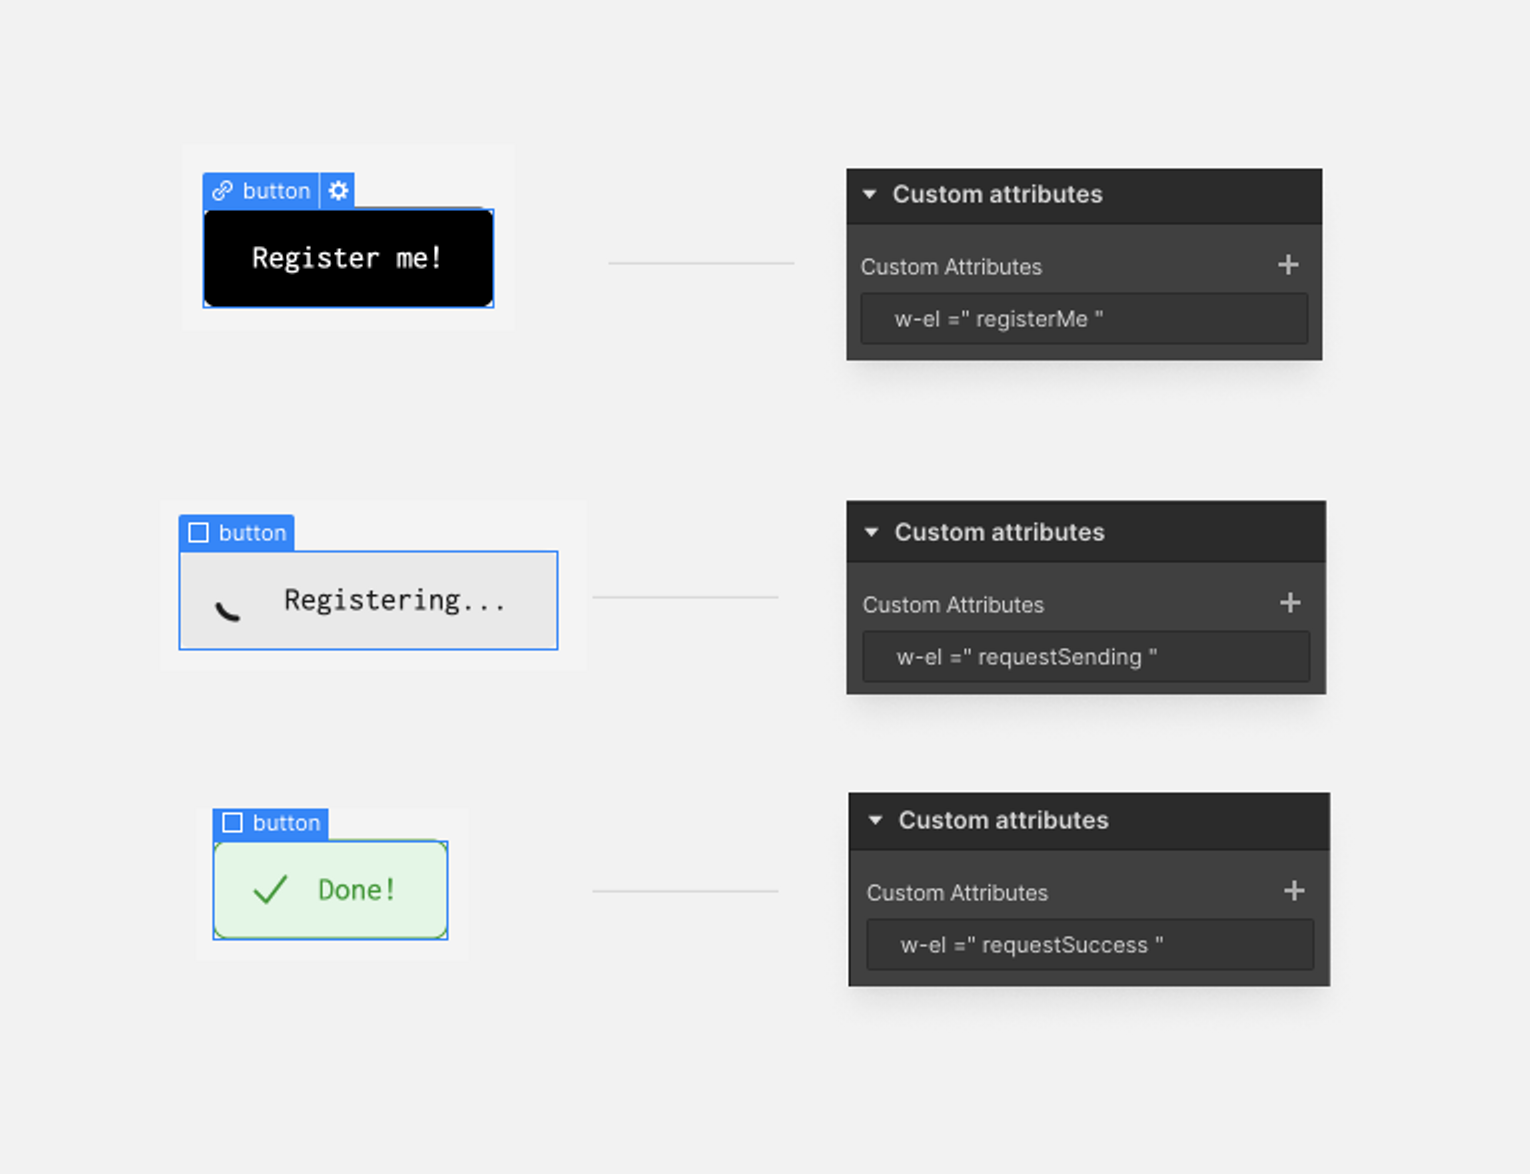
Select each element then go to Settings Panel > Custom attributes and add the relevant attribute below.
Button Element (Idle State)
Loading Element
Success Element
Once you are happy with how things look and have added the Wized attributes, publish your site then head over to Wized for the fun stuff!
Wized Setup
Add Xano to My Apps, then add a request.
ℹ️ We won’t cover in any detail how to add Xano to your project, but don’t worry, it’s easy! you can check out @EmanuelSkro's guide in the Wized Intelligence Centre here.
1. Add Xano to “My Apps” in Wized.
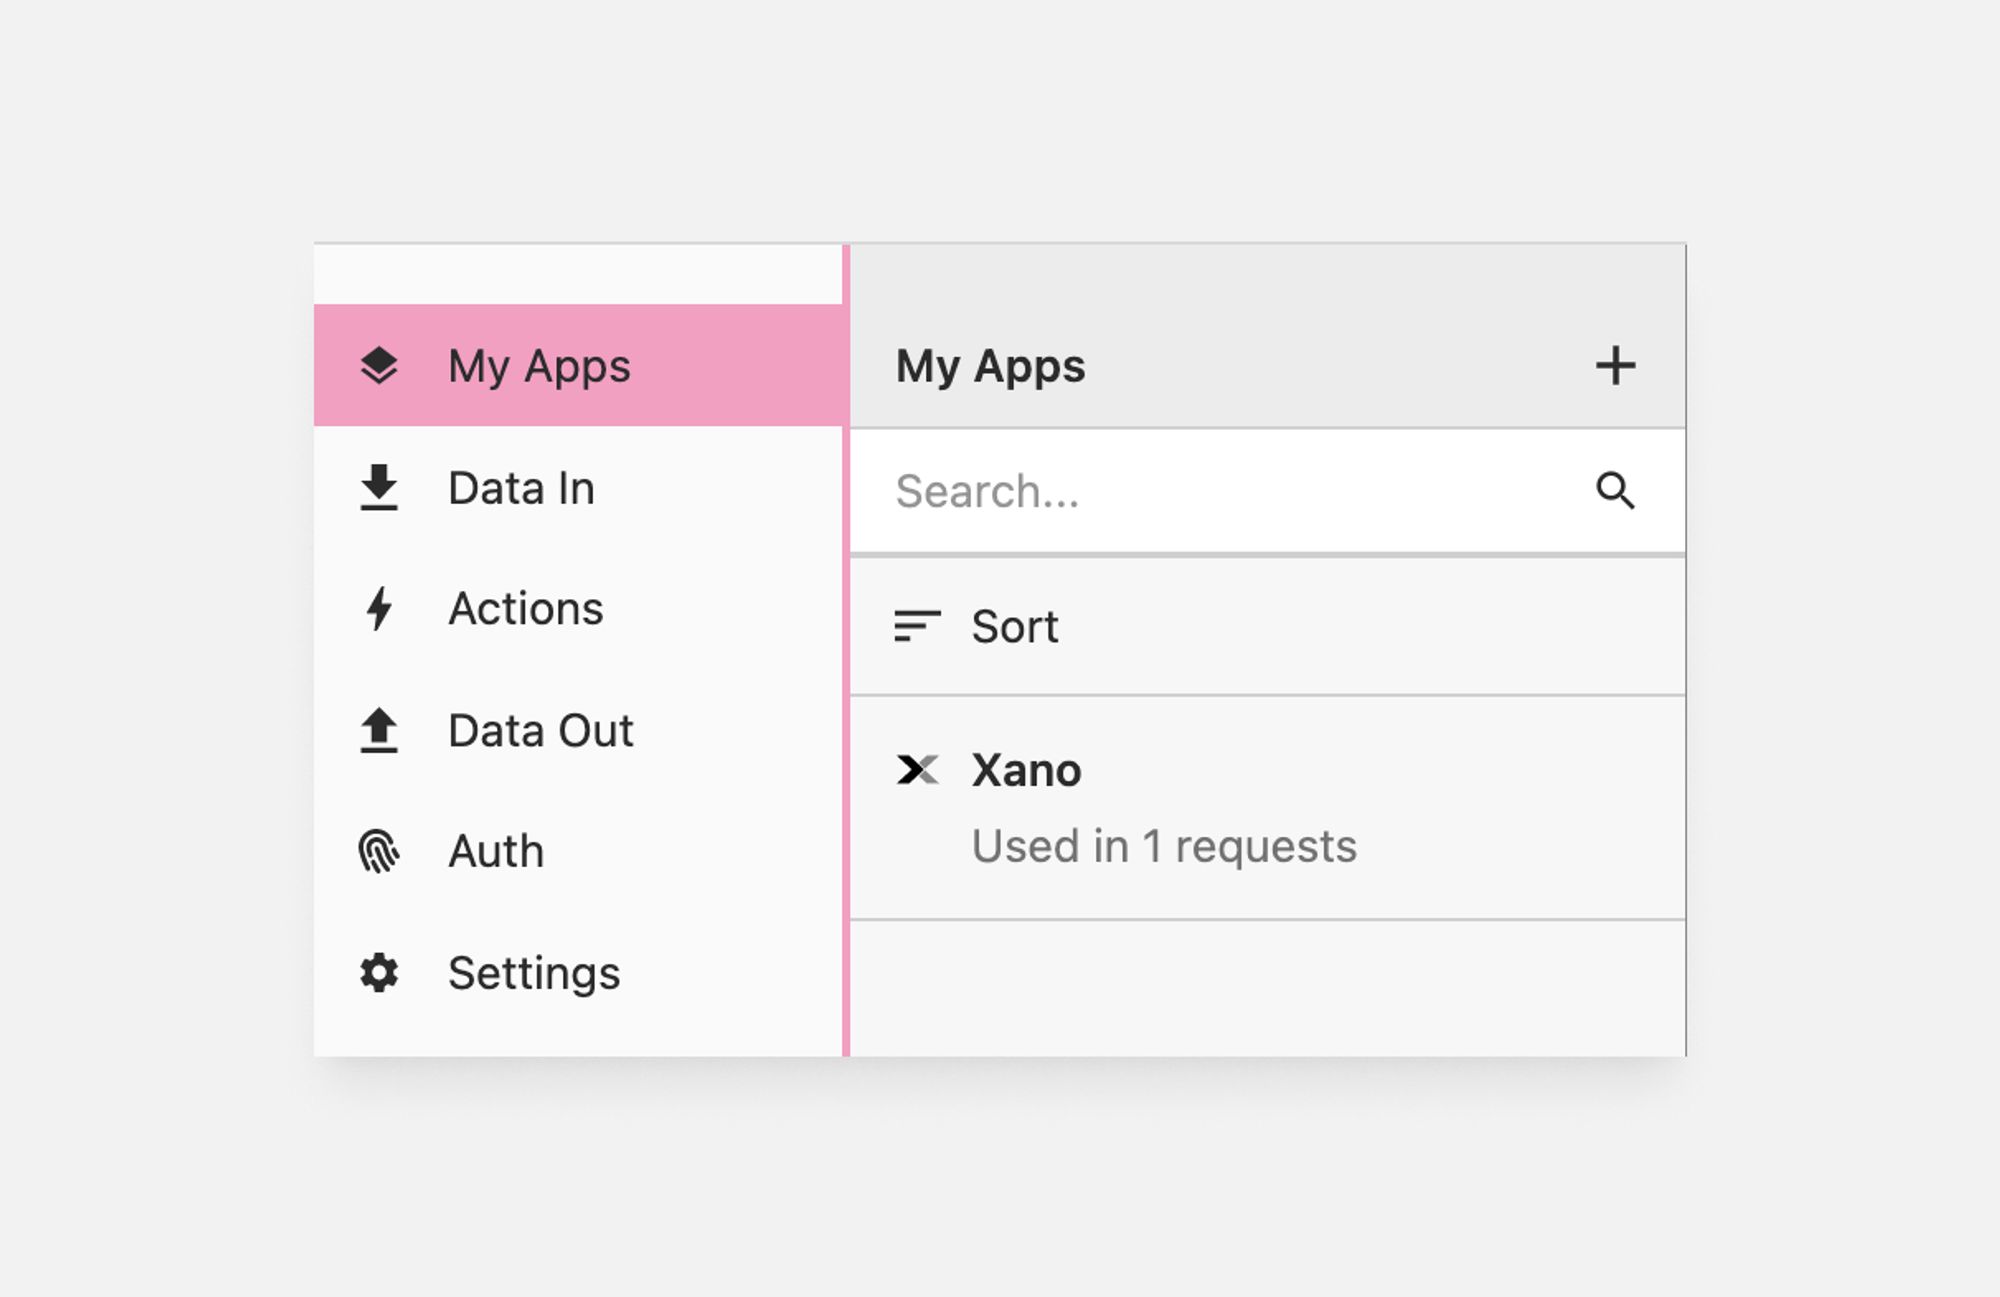
2. Add a Request to “Data In” or “Data Out”. It can be any request, as long as it sends a successful response back.
In this guide, I am using a request called “Add Registration”.
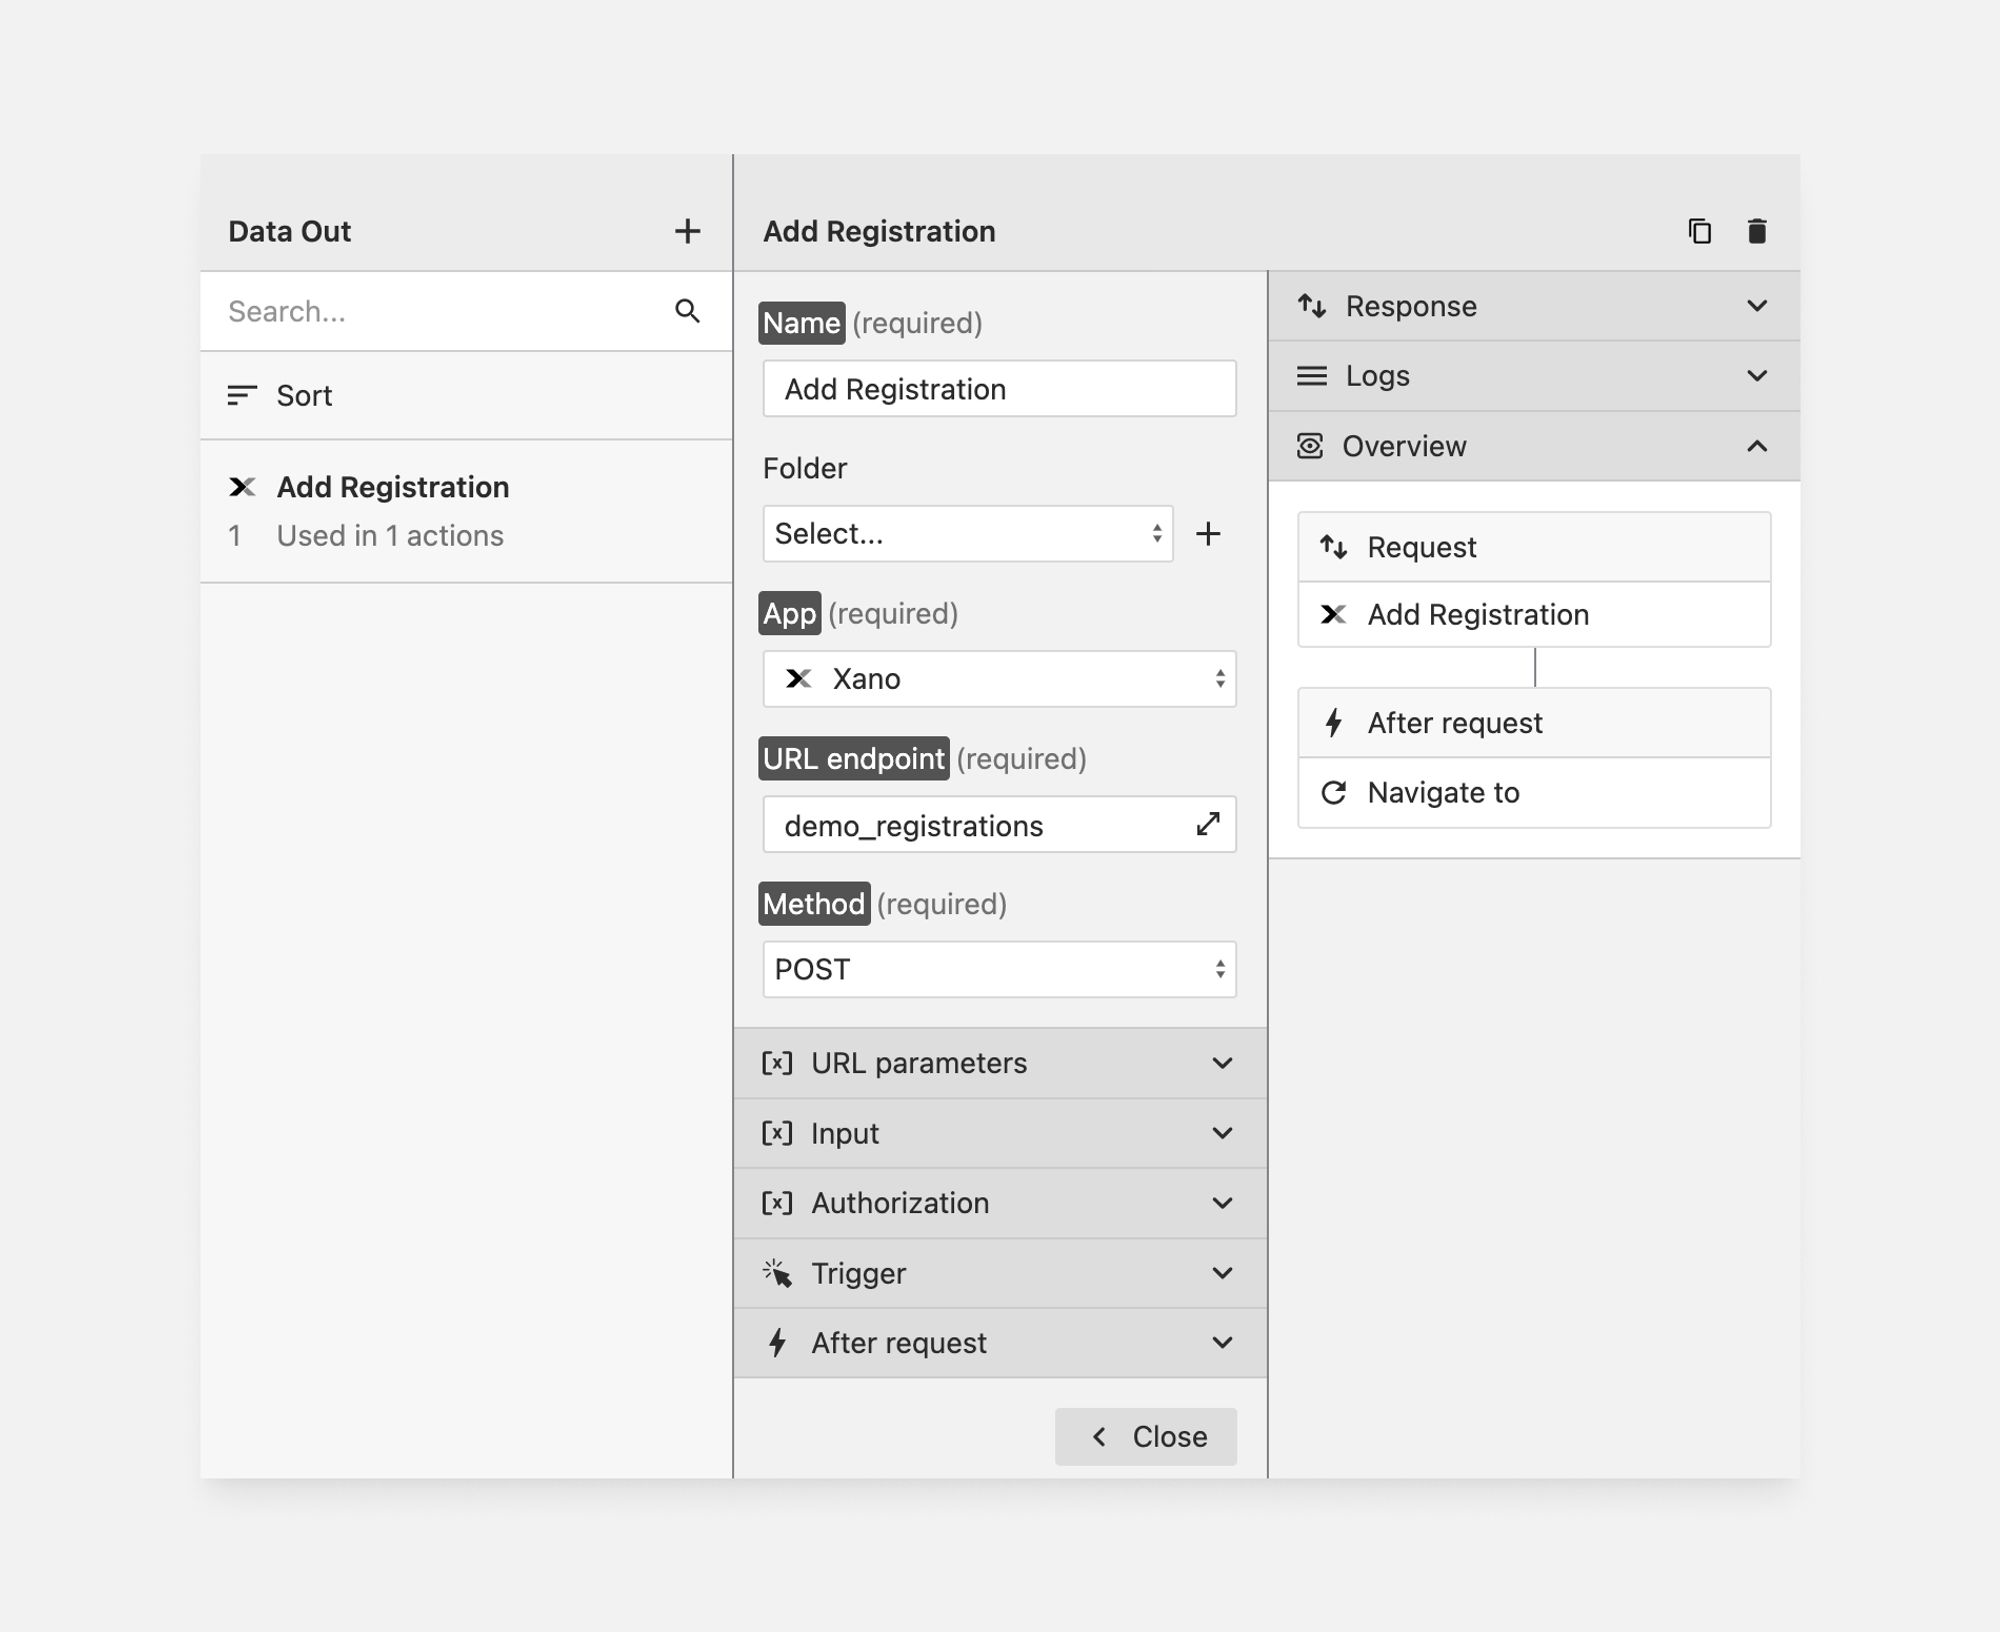
Once you have Xano setup and a request added to either Data In or Data Out, we can continue with the remaining setup.
Actions
Send Request Action
This will trigger our Xano request when clicking on the idle button, our other actions depend on this request. This Action, on it’s own, does not affect the UI in any way.
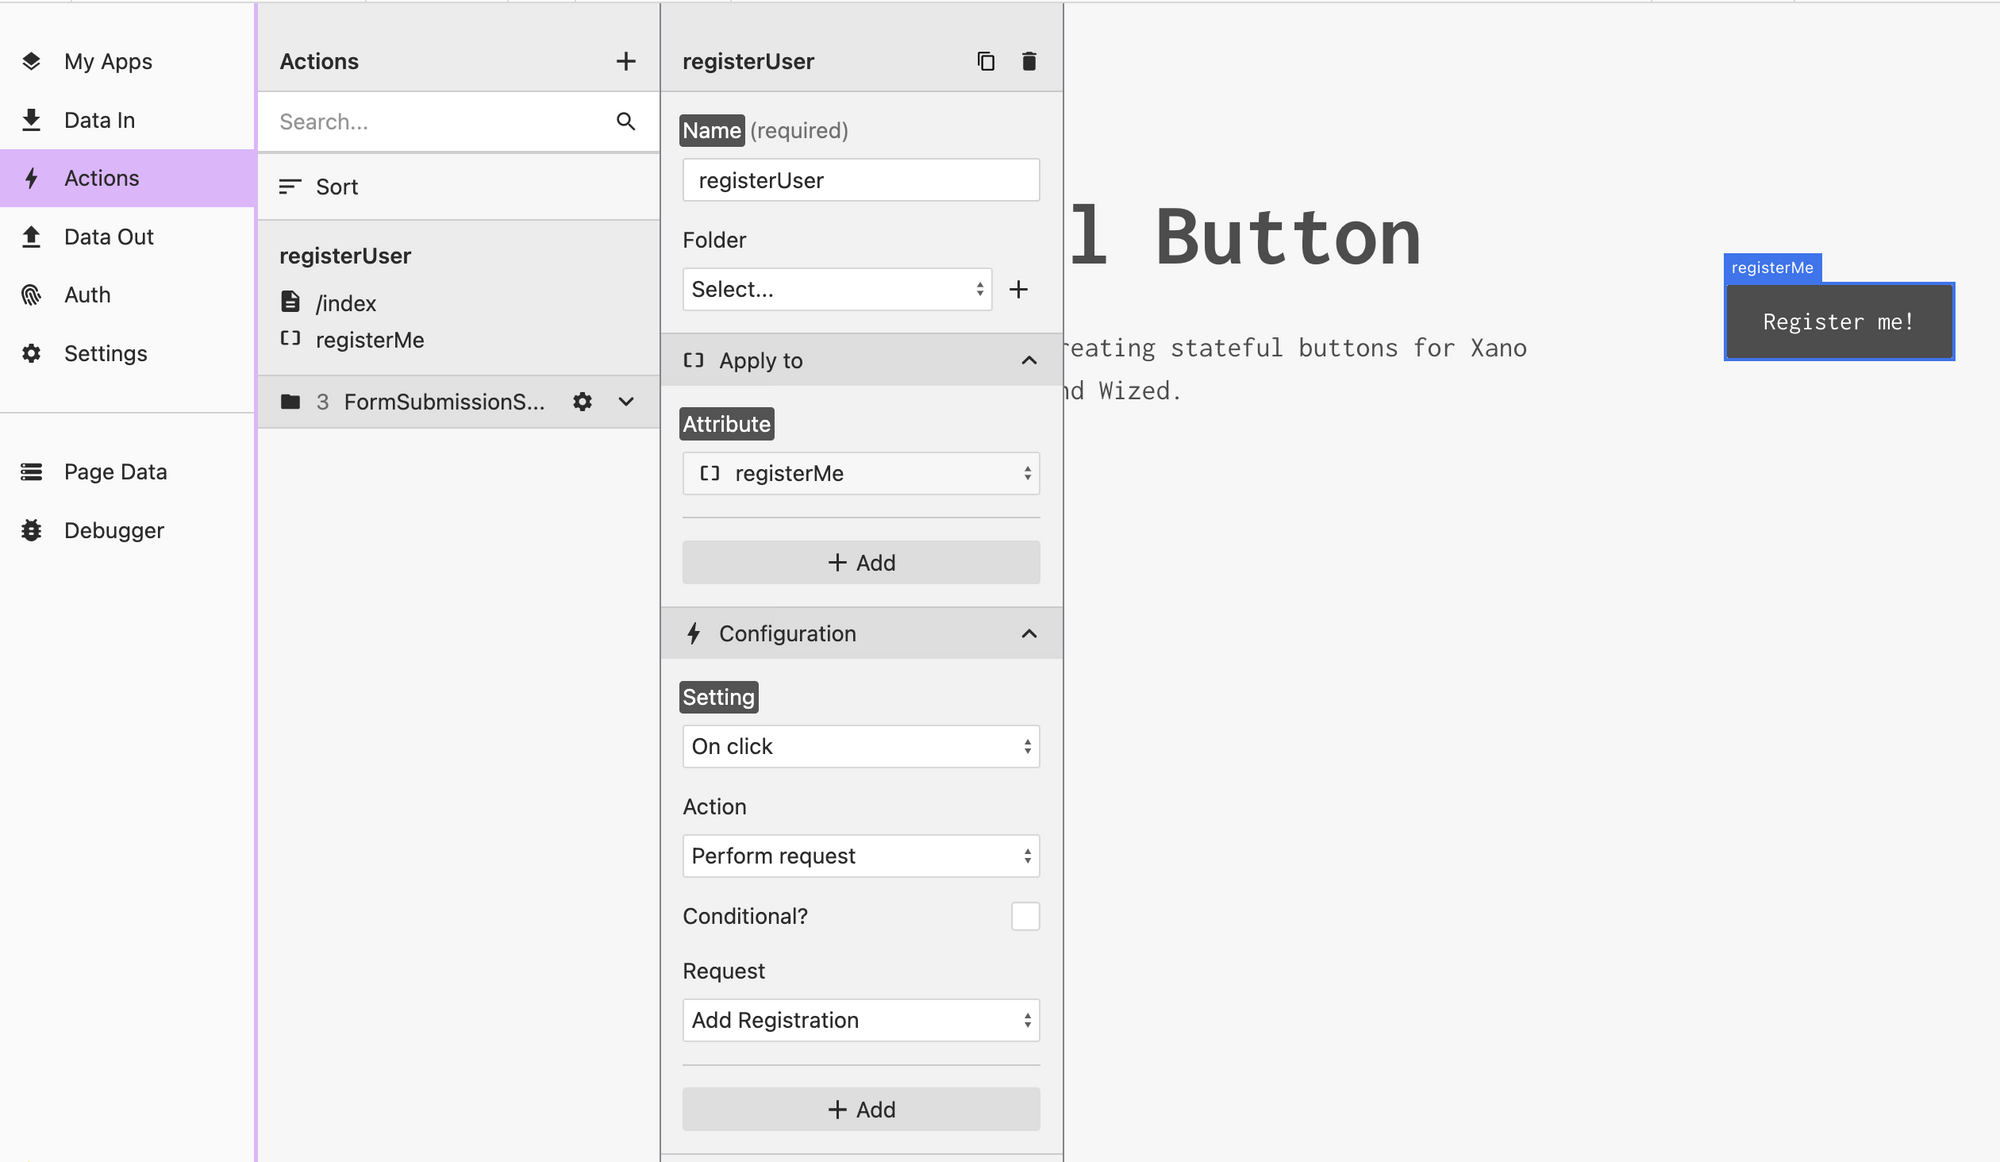
Add Action
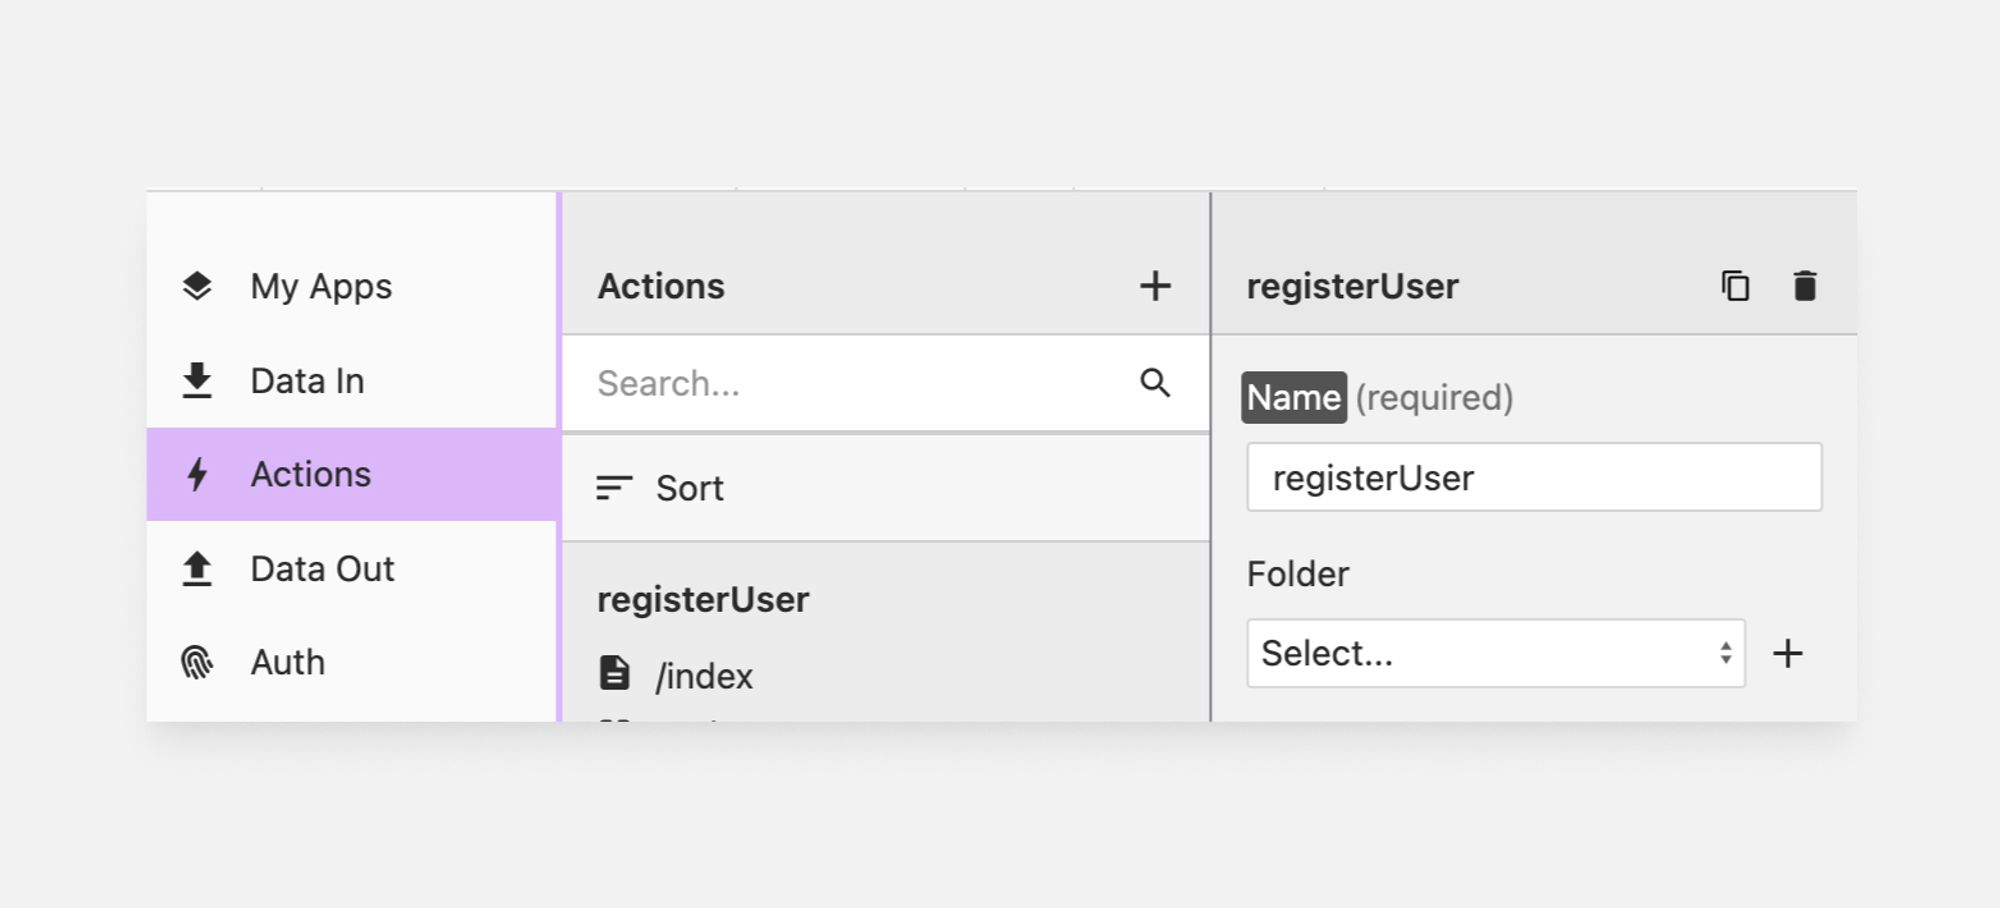
- Go to Actions, then add a new Action +
- Name it registerUser or whatever makes sense in your app.
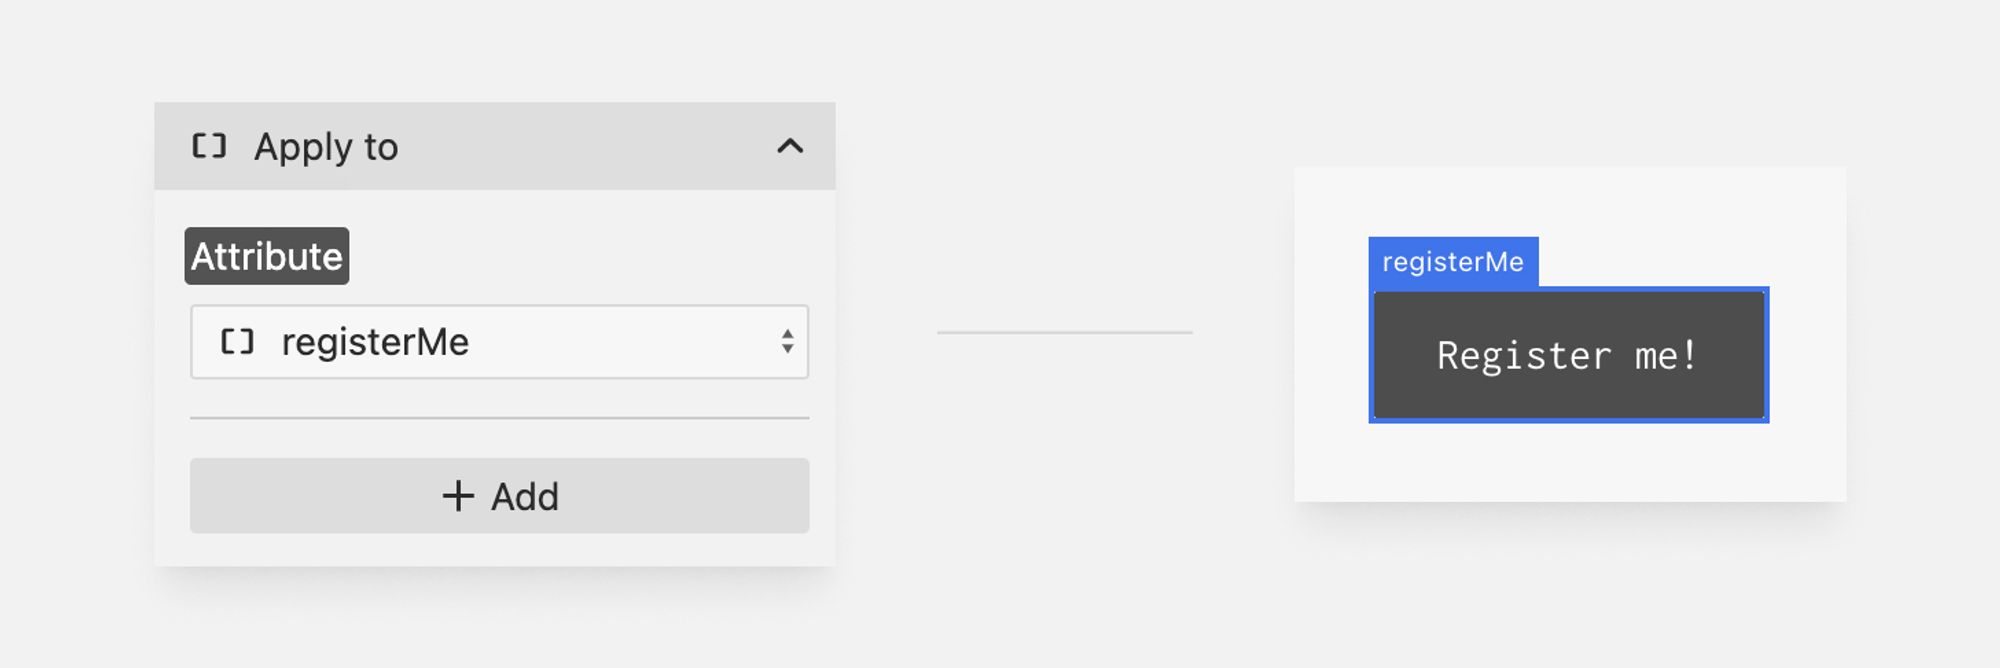
Apply to
- Under “Apply to” Apply it to the idle state button, ie. the button that shows before the user has done anything. In my app, it’s w-el="registerMe"
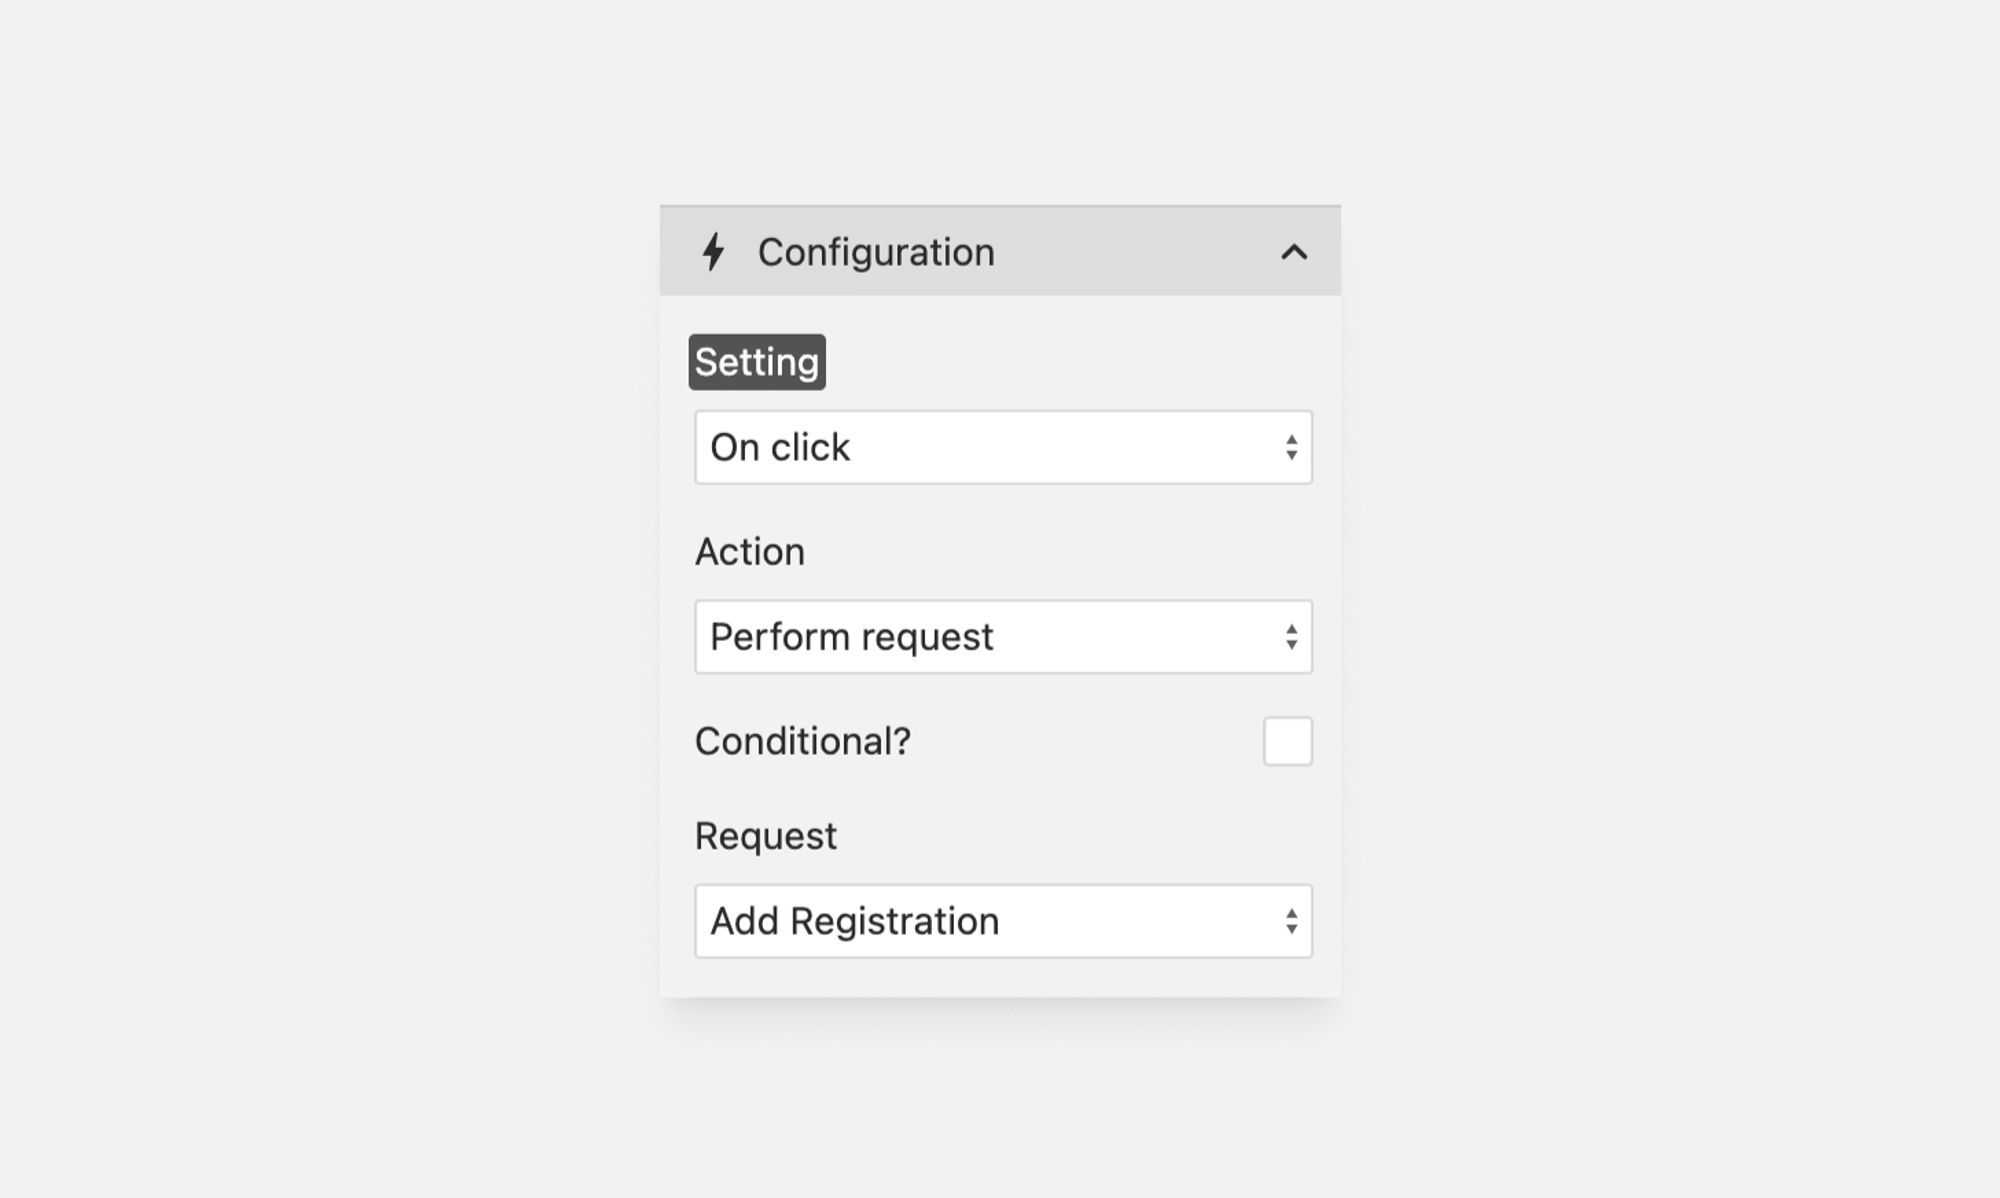
Configuration
- Trigger: On click, Action: Perform request, Request: Add Registration.
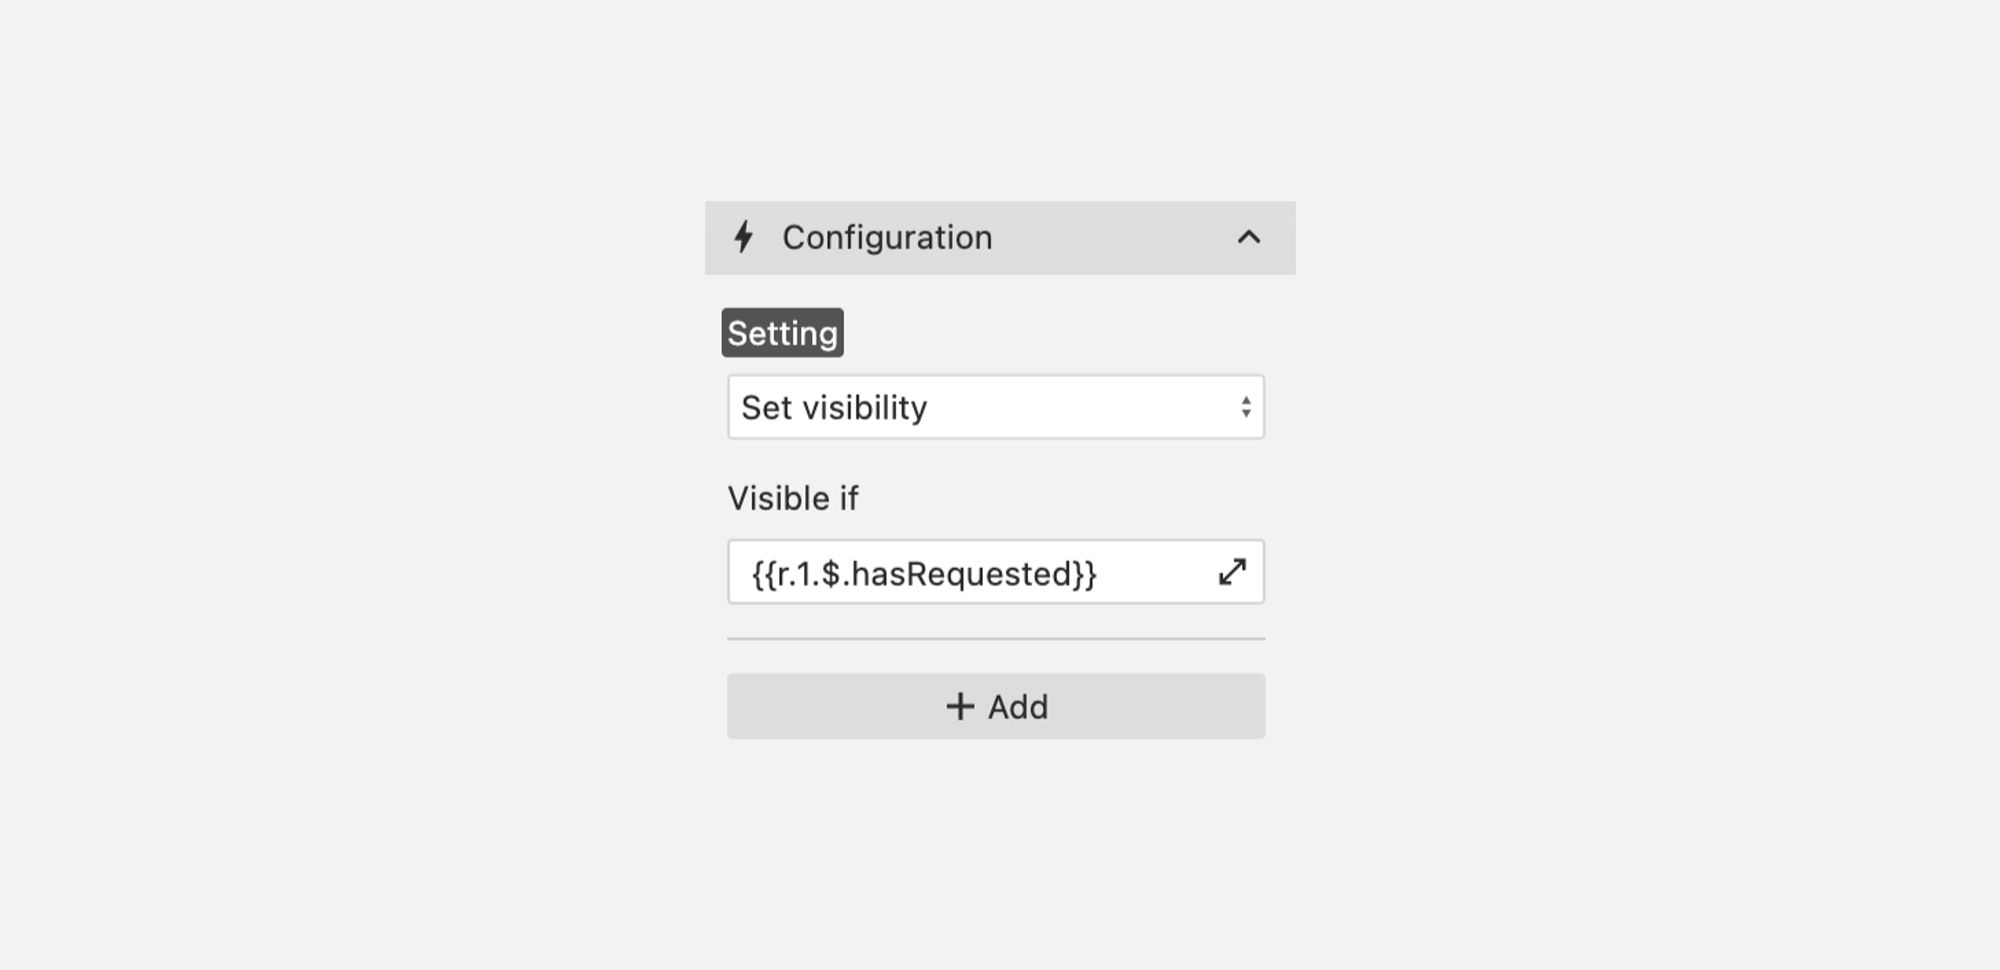
Completed Action
Idle State Action
This action controls when the idle button should be displayed.
ℹ️ For better organisation, I group all of the state controller actions under ‘FormSubmissionStates’ folder.
Add Action
- Add a new Action called idle
Apply to
- Apply to registerMe attribute.
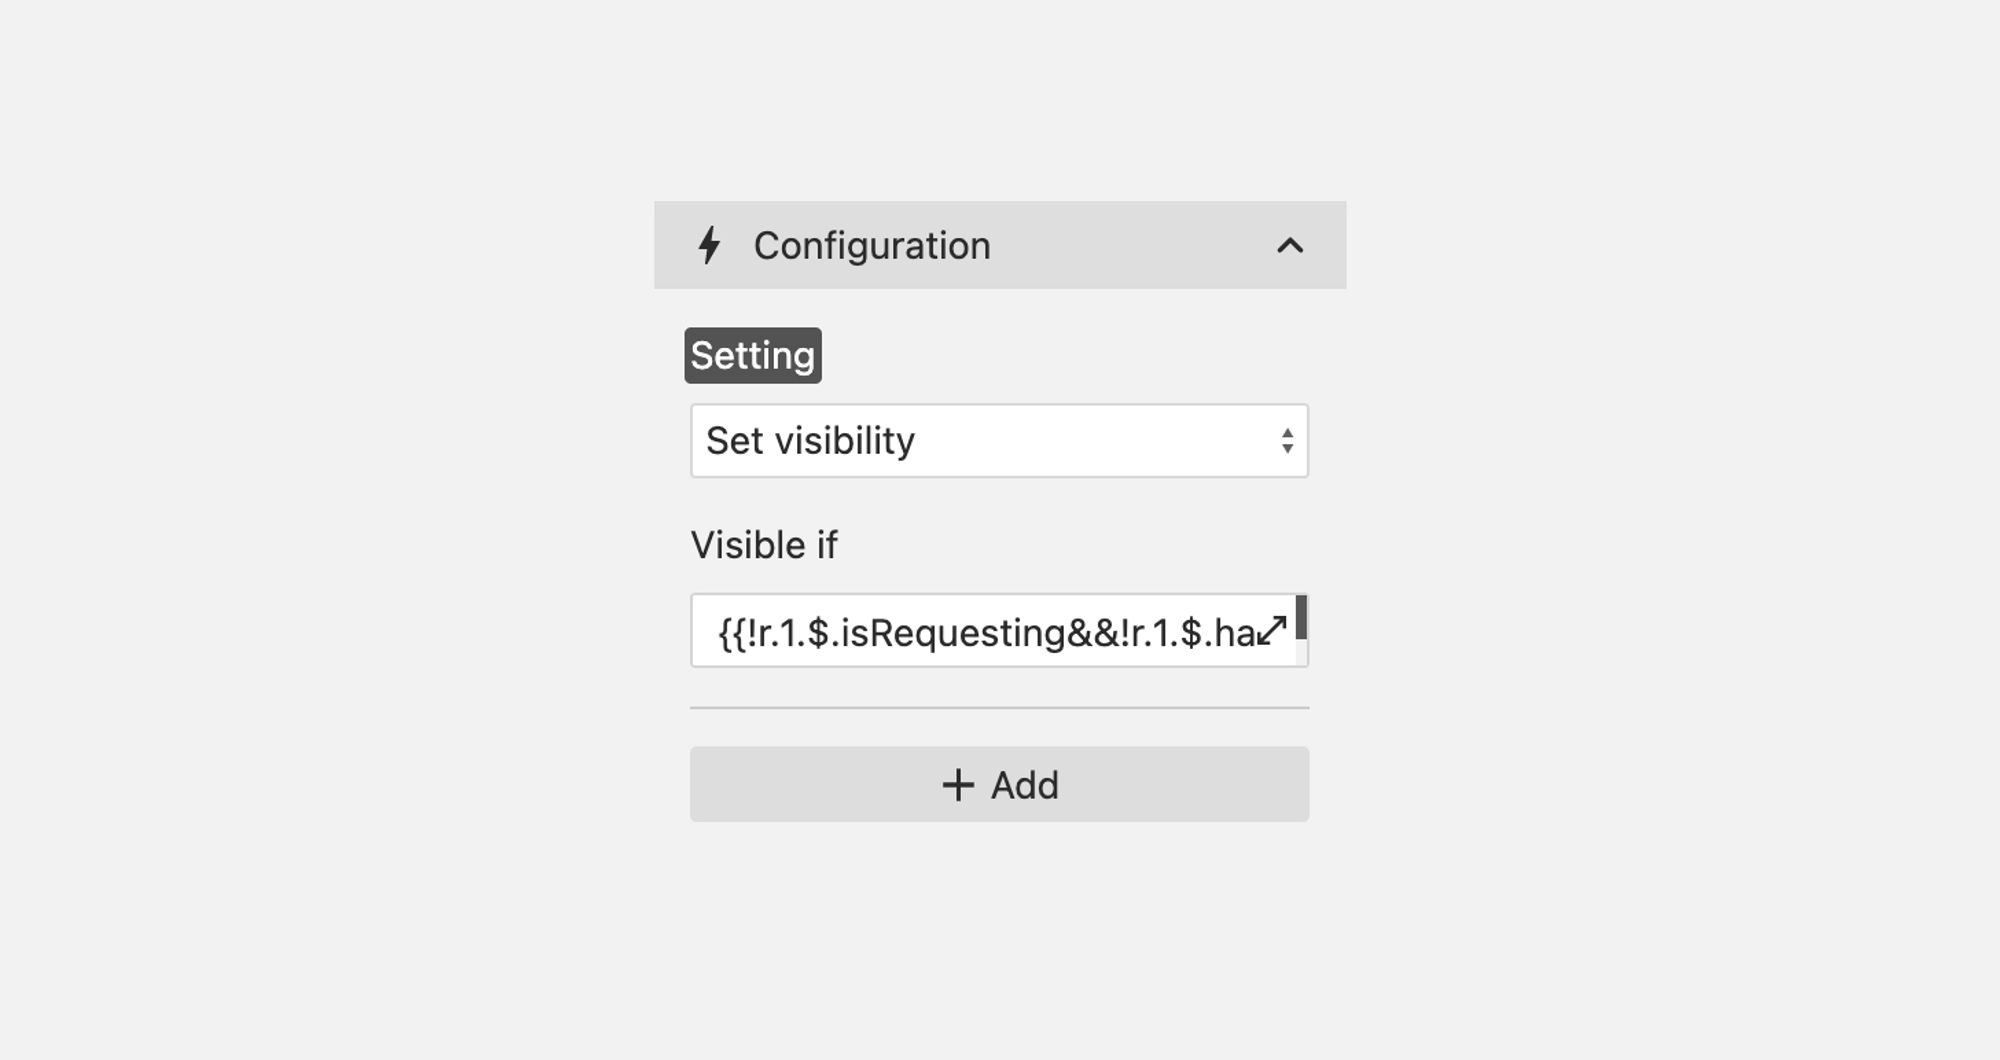
Configuration
- Under Setting dropdown, select “Set visibility”.
- Under ‘Visible if’, paste in the following code. This is a Boolean data type (true/false) and basically says. “Don’t show this element if request 1 is requesting, or has requested”.
Note: If you already have other requests in your app, then you’ll need to change r.1 to whatever request you’re using e.g. r.23
Is Requesting State Action
This is where we will show our ‘Loading’ state.
Add Action
- Setup a new Action and name it isRequesting
Apply To
- Apply this action to the requestSending Attribute
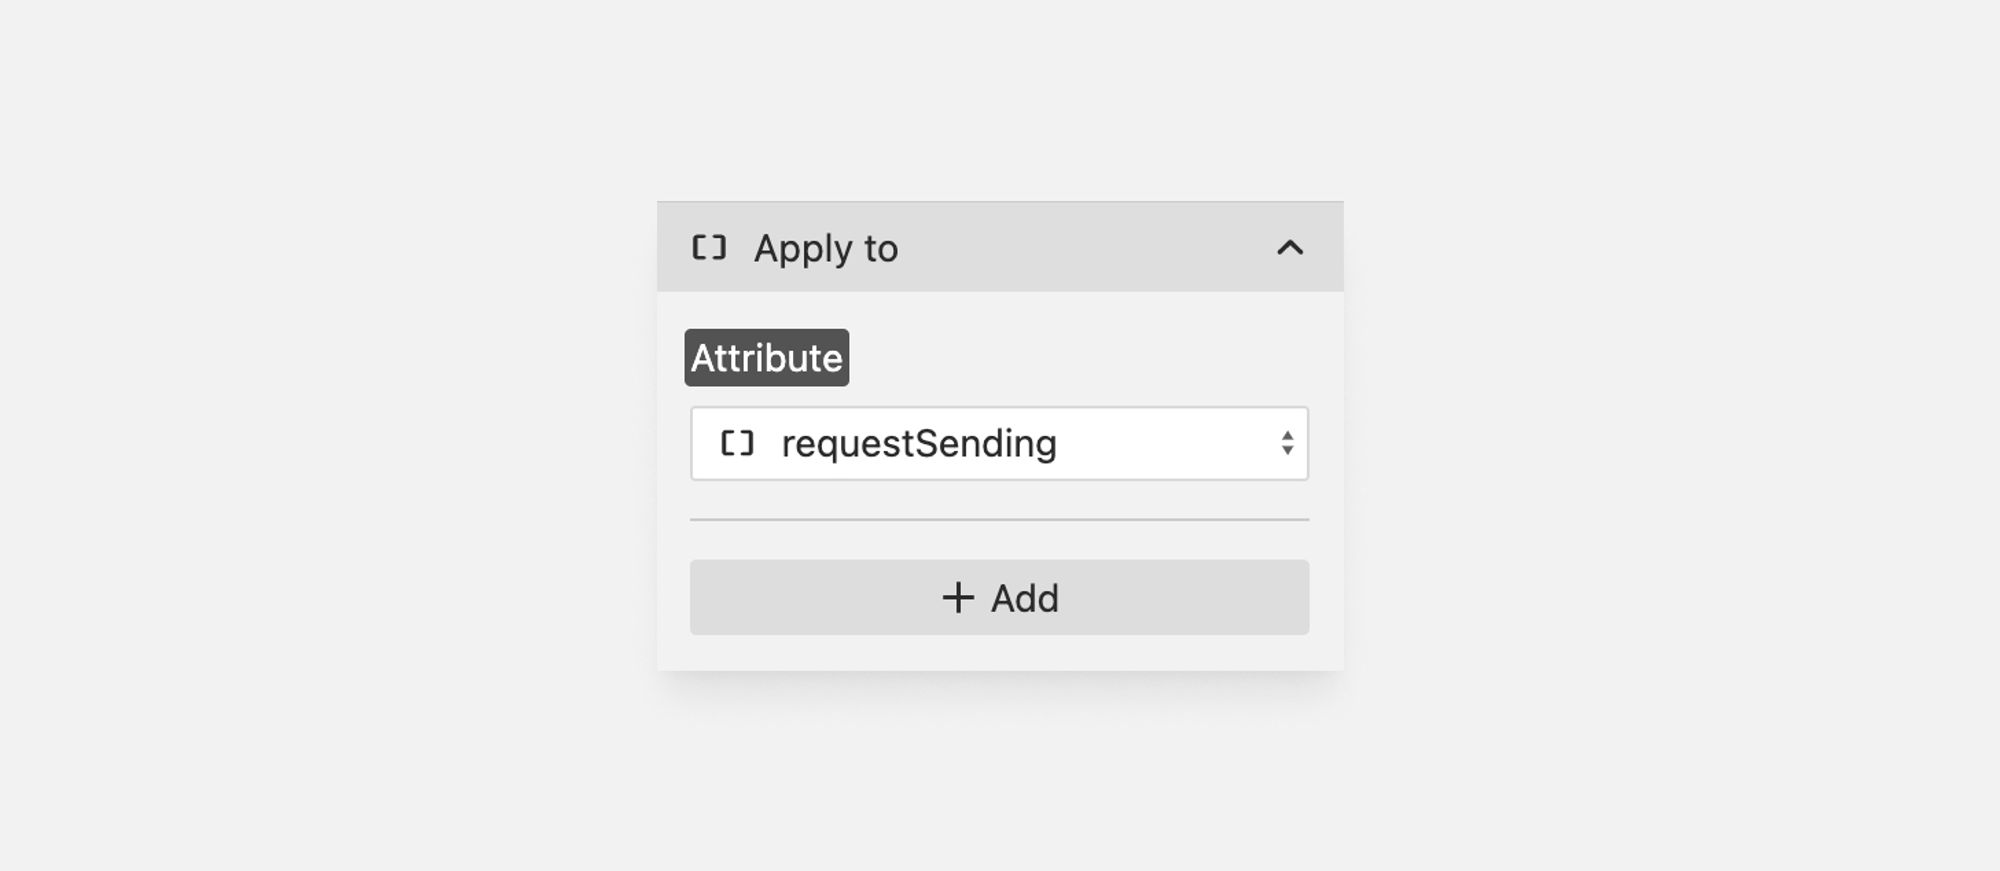
Configuration
- Under Setting dropdown, select “Set visibility”.
- Under ‘Visible if’, paste in the following code.
Note: As above, if you already have other requests in your app, then you’ll need to change r.1 to whatever request you’re using e.g. r.23

Try it out
At this stage, you can test out your app. When clicking on the “Register Me!” button, the loading state should be displayed:

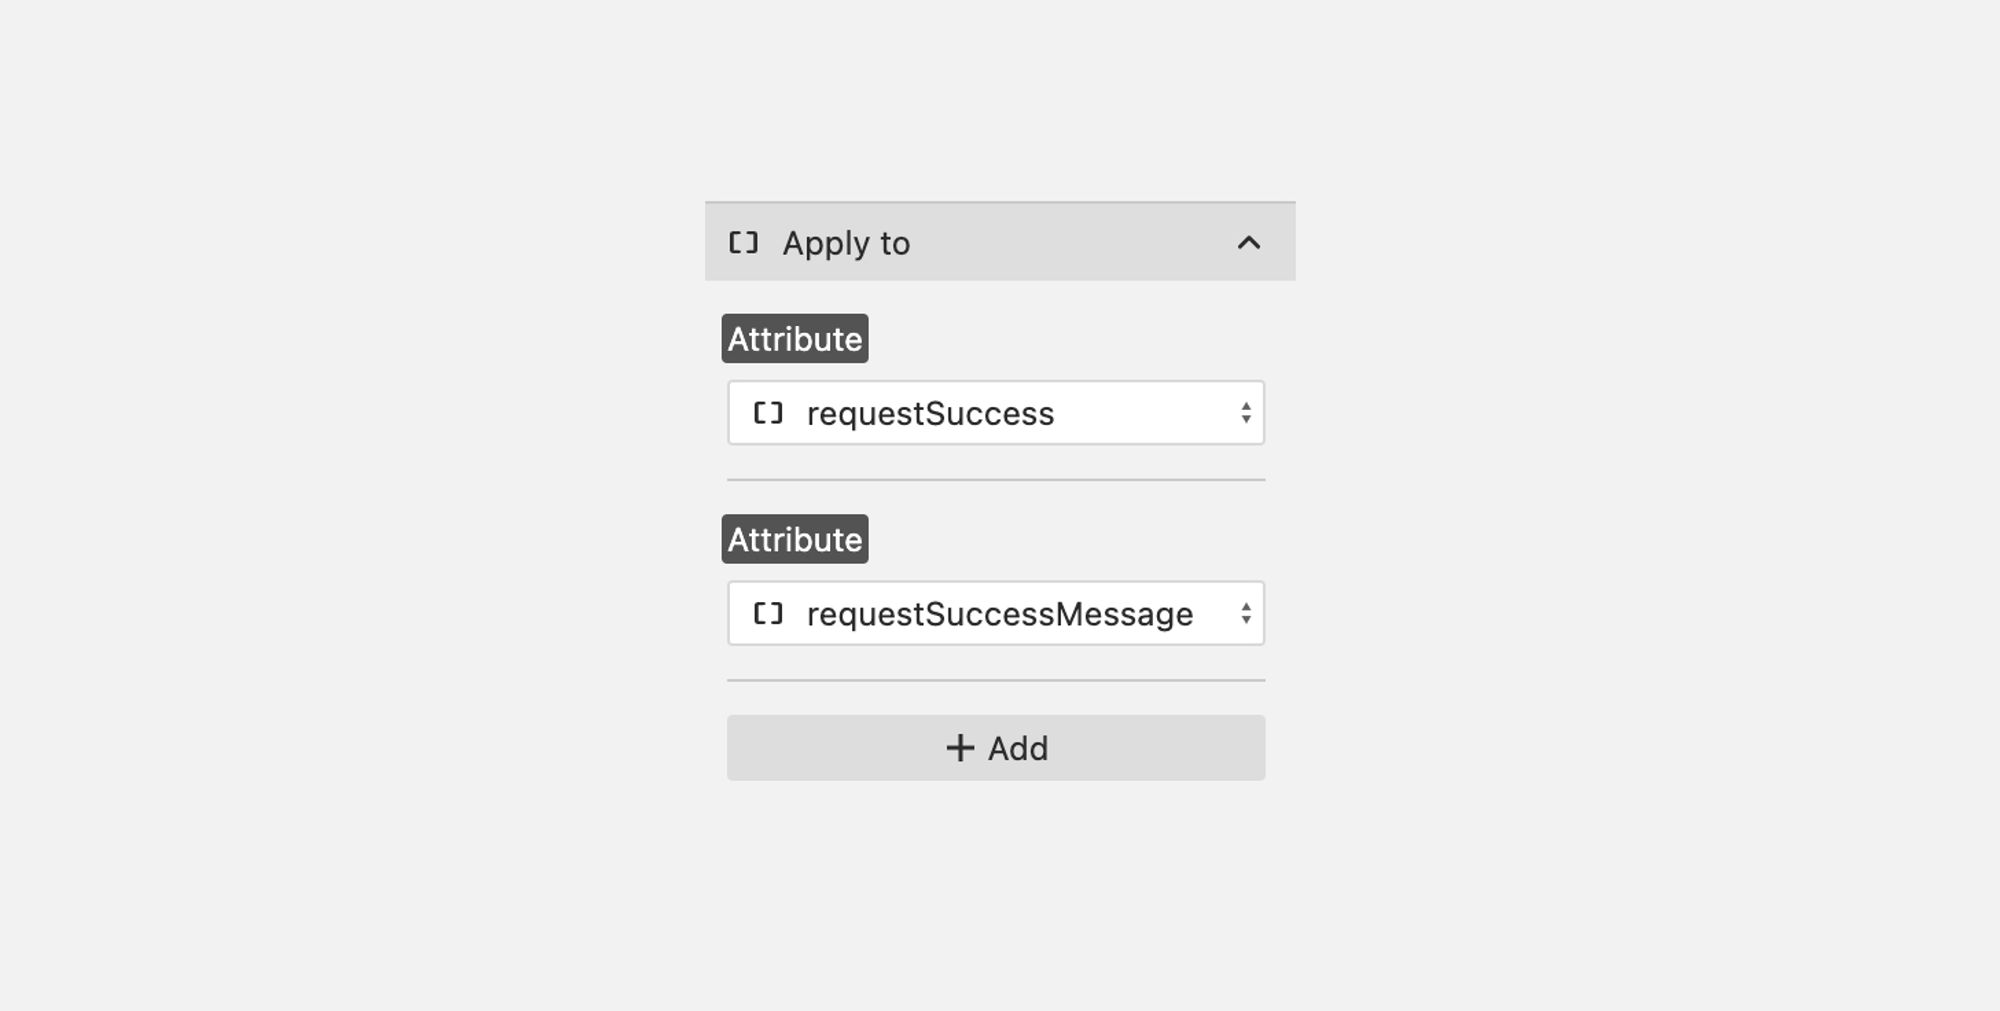
Success State Action
This action will show our Success state.
Add Action
- Setup a new Action and name it isSuccessful
Apply to
- Apply it to your requestSuccess attribute.
Note: In my Apply to settings, as you can see from this screenshot, I’m also showing a little message to the user, of course, this is optional.
Configuration
- Under Setting dropdown, select “Set visibility”.
- Under ‘Visible if’, paste in the following code.
Finished
At this point, you should be all done and you can test out your Wized stateful button! This is what you should end up with:

I hope you’ve found this guide useful and would love to see what you can create using this method. Hit me up on @flowcraft_au with your results!